Github

Github (Source: github.githubassets.com)
What is Github?
GitHub is a special developer platform created because it was inspired by the way programmers work. From open source to business, we can review code, manage projects, and build software with more than 56 million users worldwide.
Simply put, GitHub is a project management, version control system (VCS), as well as a social network platform for developers all over the world.
Why do we need Github?
1. Facilitate collaboration on project work
Github’s main function is to facilitate online collaboration when working on a project. With distributed version control, all developers or team members can manage code in one place. For example, conducting joint code reviews, bug fix discussions, and so on.
Apart from that, GitHub also provides a project management feature in the form of a Kanban board like Trello (more details about Kanban here. This feature is certainly very useful for those who have many projects. Because, we can more easily determine work priority, manage workflow, and see the progress of the project.

Github Portfolio (Source: docs.github.com)
2. As a portfolio for developers
Github also functions as a portfolio for developers.

Github Portfolio (Source: camo.githubusercontent.com)
On GitHub, we can set the projects we are working on to be displayed publicly. This will show our abilities as professionals.
That way, prospective clients or targeted companies can immediately see our work and contributions to various projects according to our expertise.
Create Github Account
We can create a Github account for free here. Follow the steps and we are ready to discuss more about Github.
Repository
Remote Repository
- Local repository: Git repository stored on our computer.
- Remote repository : Git repository stored on the server.
For our lesson now, we will put our remote repository on a Github server.
Create a repository in Github
We can create a new remote repository on our Github by:
- Go to the github.com page and click + drop-down menu in the top right corner, then select New repository
- We will be directed to the Create a new repository page, then fill in the requested information. Here’s an example:
When finished, click the Create repository button. So our Github repository has been created and is ready to be used to store projects and collaborate with our team.
Auth Github
To keep your Github account secure, we must authenticate before we can access certain resources on Github. Github has several different authentication modes, namely:
- SSH keys
- Personal access token
- Username and password with two-factor authentication
Here we will learn more about authentication with SSH keys
SSH Key
SSH (Secure Shell) is a transfer protocol that allows users to control a device remote or from a distance via an internet connection securely. So we can connect to Github to access and manage our repositories without providing username and personal access token in every Git command we run.
Generate SSH key
Open the Linux terminal or WSL for Windows users.
Follow the commands below:
> ssh-keygen -t ed25519 -C "[email protected]" # IMPORTANT: Replace with your email
Generating public/private algorithm key pairs.
Enter file in which to save the key (/home/user/.ssh/id_ed25519): # [Press enter]
Enter passphrase (empty for no passphrase): # [Type a password]
Enter same passphrase again: # [Type password again]
Adding your SSH key to the ssh-agent
ssh-agent is a program that manages SSH keys and remembers our password. So we don’t need to re-enter the password every time we use SSH key, just follow the steps below:
Open the Linux terminal or WSL for Windows users.
Follow the steps below:
> eval "$(ssh-agent -s)" # ensure ssh-agent is running
Agent pid 59566
> ssh-add ~/.ssh/id_ed25519 # add our SSH key to ssh-agent
Enter passphrase for /home/user/.ssh/id_ed25519: # [Type SSH key password]
Identity added: /home/user/.ssh/id_ed25519 ([email protected])
Add SSH key to Github
So that Github can accept connections from our computer, we need to add the SSH key that we generated earlier to our Github account.
Copy the SSH public key to the clipboard.
> clip < ~/.ssh/id_ed25519.pub # Copy the contents of the id_ed25519.pub file to the clipboardNote: If
clipdoesn’t work, read the contents of the file with the commandcat ~/.ssh/id_ed25519.pubthen copy the contents of the file.In the top right corner of any page, click your profile photo, then click Settings.
In the “Access” section of the sidebar, click 🔑 SSH and GPG keys.
Click New SSH key or Add SSH key.
In the “Title” field, add a title for the new key. This title can be filled in with the name of your device or other identification that is easy to distinguish.
Paste the key that has been generated into the “Key” field.
Click Add SSH key.
If prompted, confirm your Github password.
Pull and Push
What are git pull and git push?
git pull: a command to take allcommitsin remote branch and merge each commit with local branch.git push: a command to upload allcommitsin local branch to remote branch.
By default, git push and git pull only perform operations on the current branch. So, it’s best to use the git status command to see which branch we are in before doing git push or git pull.
How to Use git pull
The git pull command is:
> git pullExample of using git pull
For example, on another computer that has the same repository, we haven’t gotten the update commit with the message “docs: add guide notes” that we push before.
> git log --oneline
71efdaa (HEAD -> main, origin/main) docs: add ideation
5dfaf0b docs: add README.md
So do git pull to get the update:
> git pull
> git log --oneline
a144815 (HEAD -> main, origin/main) docs: add guide notes
71efdaa docs: add ideation
5dfaf0b docs: add README.md
So you can see that there is an additional commit with the message “docs: add guide notes”.
How to Use git push
It is recommended to run the git pull command before starting to make changes. This will update our local branch with all new commits that other contributors may have made.
Commonly used git push commands are:
Push to specific remotes and
branches> git push <remote name> <branch name>Example:
> git push origin mainWe can also ensure that every time we do a
pushit always goes to the same remote, by running the command:git push -u <remote name> <branch name>So after we run
git pushwith the-uoption, we simply rungit pushwithout having to provide the remote andbranchnames again.Example:
> git push -u origin main
> git push # here we don't need to provide the remote and branch name anymore
Push all
branches> git push --all
Example of using git push
 Commits that exist in the remote repository before being pushed
> git log --oneline
a144815 (HEAD -> main) docs: add guide notes
71efdaa (origin/main) docs: add ideation
5dfaf0b docs: add README.md
We see that between the screenshot and the log above, there is one commit that is not yet in the remote (“docs: add guide notes”).
Now try executing the git push command.
> git push
> git log --oneline
a144815 (HEAD -> main, origin/main) docs: add guide notes # now this commit is in the remote repository
71efdaa docs: add ideation
5dfaf0b docs: add README.md
It can be seen that our commit has been successfully push to the remote repository.
So that’s how we collaborate using remote repositories.
Clone
What is git clone?
The git clone command is used to make a copy of a particular repository from a remote repository to our local computer.
Cloning will copy the entire remote repository, including all files, commit and branch.
How to Use git clone
The way to do cloning is:
On GitHub.com, navigate to the main page of the repository to be_cloned_.
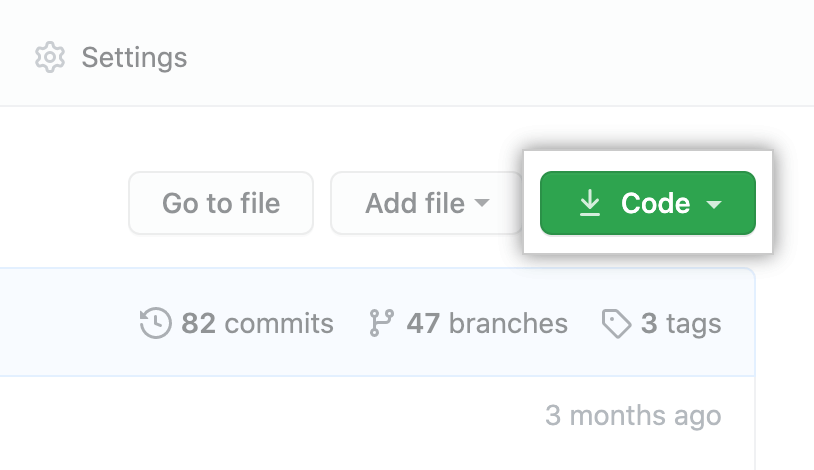
Above the file list, click ⤓ Code.

Code buttons Select the SSH tab to copy the repository url and clone the repository with the SSH protocol:
Open the Linux terminal or WSL on Windows.
Change the current folder to where we will save the clone.
Type
git clone, then paste the remote URL you copied earlier and press Enter.> git clone [email protected]:ruang-guru/playground.git Cloning into `playground`... remote: Counting objects: 10, done. remote: Compressing objects: 100% (8/8), done. remove: Total 10 (delta 1), reused 10 (delta 1) Unpacking objects: 100% (10/10), done.We can see the cloned remote URL with the command
git remote -v:> git remote -v origin [email protected]:ruang-guru/playground.git (fetch) origin [email protected]:ruang-guru/playground.git (push)Notice that we now have a clone repository located in folder
playground:bash > ls playground README.md frontend introduction-to-programming ...
Now we can use the repository on the local computer and change it as needed.
Collaboration
Collaborative development models are divided into 2, namely:
Fork and pull model: we do not need permission from the repository owner to
pushand changes are submitted by making a pull request from theforkto the original repository.Shared repository model: collaborators are given
pushaccess to one repository andbranchesare created when changes need to be made, pull requests are made to review changes that have been made.
Git Flow
Collaborating on Github requires us to discuss with other people every change that occurs. Usually the journey is as follows:
- Create a branch: creates a
branchso we can make changes without disturbing the flow of the main branch. - Make changes:
commitandpushchanges made tobranchuntil ready to request feedback. - Create a Pull Request: to request feedback from collaborators about the changes we make.
- Address review comments: the reviewer makes questions, comments, and suggestions on the changes made and continues to
commitandpushin response to the review results. - Merge your Pull Request: after the Pull Request is approved, do merge the Pull Request that we created.
- Delete your branch: indicates that work in
branchhas been completed.
Pull Request
PR (Pull Request) is a request to add changes to Github. When making homework, make a summary of the changes and issue to be solved, you can use images, links, or tables.
 PR Body (source: docs.github.com)
We can also add comments to certain lines to indicate something to the reviewer.
 PR comment (source: docs.github.com)
Creating a pull request
We can create a PR (Pull Request) by following the documentation: Creating a pull request.
We can also create a PR for
forkby following the documentation: Creating a Pull Request from a Fork.
PR Review
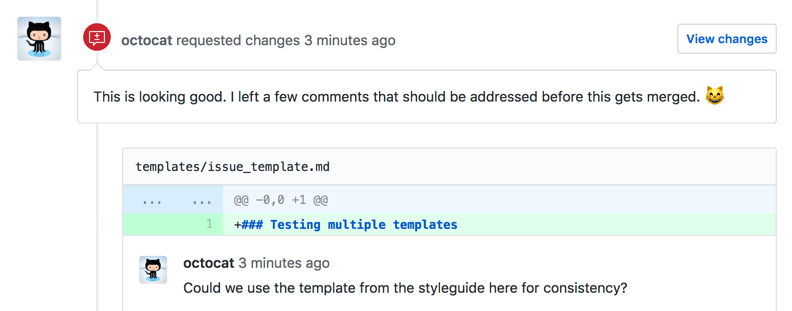
Review is the activity of commenting on proposed changes, approving changes, or requesting changes before a PR is merged.
 Review with comment (source: docs.github.com)
Status Review
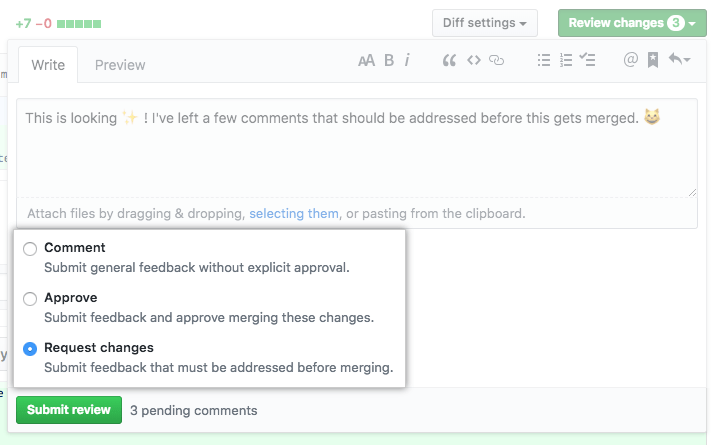
A review has three possible status, namely:
- Comment: provide feedback without agreeing to changes or requesting additional changes.
- Approve: provides feedback and approves the incorporation of proposed changes.
- Request changes: provides feedback that must be addressed before changes can be merged.

PR statuses (source: ocs.github.com)
We can see all reviews in the Conversation timeline tab, and we can see reviews by collaborators in Pull Request’s merge box.

Conversation (source: docs.github.com)

Review in merge box (source: docs.github.com)
Resolving conversations
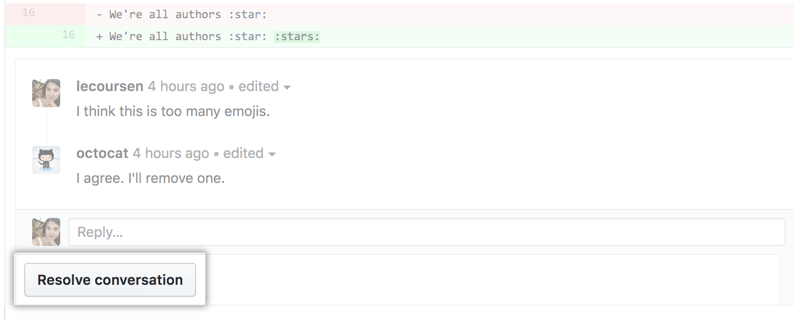
We can finish the conversation to show that the file has finished changing, we can click Resolve conversation in the comment bar.

Resolve conversation button (source: docs.github.com)
All conversations will be collapsed and marked as resolved, making it easier to find conversations that still need to be addressed.

Resolved conversation (source: docs.github.com)
Re-requesting a review
We can request a review after we make changes. To do this, on the sidebar tab Conversation, click ![]() (icon).
(icon).

For more details on how we comment on PRs we can see the documentation: Commenting on a pull request.
Organization
What is the organization in Github?
Organizations on Github are shared accounts where businesses and open-source projects collaborate with multiple projects at once. Owner and Administrator can manage member access to data and organizations with advanced security and administrative features.
Everyone who uses GitHub can use their account to create an organization. These organizations include:
- Unlimited membership with multiple roles providing varying levels of access to the organization and its data
- Ability to grant members various access permissions to repositories in the organization
- Create teams to reflect a company or group structure with tiered access permissions
All organizations can have both public and private repositories.
Create an organization in Github
How to create an organization is quite easy, we can follow these steps:
- In the top right corner of any page, click your profile photo, then click Settings.
- In the “Access” section of the sidebar, click Organizations.
- In the “Organizations” section, click New organization.
- Follow the instructions to create an organization. More details can be seen at the following link: “GitHub’s products”
Accessing your organization’s settings
The organization’s account settings page provides several ways to manage accounts, such as billing, team membership and repository settings.
- In the top right corner of GitHub.com, click your profile photo, then click Your organization.
- Next to the organization, click Settings.
There are more information there that can be customized for your Organization.
 Conversation menu (source: