Pretrained CNN Model

Pretrained Model

So far we have been creating our own CNN model. Are there pretrained CNN model ?

Yes, there are, quite a lot, some of the most popular are: - ResNet: Residual Networks (ResNets) are known for their effectiveness in deep learning tasks. Models like ResNet-50, ResNet-101, and ResNet-152 are available, and you can fine-tune them on your specific high-res dataset.

  • InceptionV3: The Inception architecture, particularly InceptionV3, is designed to capture intricate patterns in images and is suitable for high-res images.

  • VGG16 and VGG19: The VGG architecture, specifically VGG16 and VGG19, consists of multiple convolutional layers and is effective for image classification tasks.

Let’s start with one of the easiest: AlexNet

AlexNet

import torchvision.models as models

# weights = None means that we don't want to load the weights of the model, only the architecture
alexnet = models.alexnet(weights=None)
print(alexnet)
AlexNet(
  (features): Sequential(
    (0): Conv2d(3, 64, kernel_size=(11, 11), stride=(4, 4), padding=(2, 2))
    (1): ReLU(inplace=True)
    (2): MaxPool2d(kernel_size=3, stride=2, padding=0, dilation=1, ceil_mode=False)
    (3): Conv2d(64, 192, kernel_size=(5, 5), stride=(1, 1), padding=(2, 2))
    (4): ReLU(inplace=True)
    (5): MaxPool2d(kernel_size=3, stride=2, padding=0, dilation=1, ceil_mode=False)
    (6): Conv2d(192, 384, kernel_size=(3, 3), stride=(1, 1), padding=(1, 1))
    (7): ReLU(inplace=True)
    (8): Conv2d(384, 256, kernel_size=(3, 3), stride=(1, 1), padding=(1, 1))
    (9): ReLU(inplace=True)
    (10): Conv2d(256, 256, kernel_size=(3, 3), stride=(1, 1), padding=(1, 1))
    (11): ReLU(inplace=True)
    (12): MaxPool2d(kernel_size=3, stride=2, padding=0, dilation=1, ceil_mode=False)
  )
  (avgpool): AdaptiveAvgPool2d(output_size=(6, 6))
  (classifier): Sequential(
    (0): Dropout(p=0.5, inplace=False)
    (1): Linear(in_features=9216, out_features=4096, bias=True)
    (2): ReLU(inplace=True)
    (3): Dropout(p=0.5, inplace=False)
    (4): Linear(in_features=4096, out_features=4096, bias=True)
    (5): ReLU(inplace=True)
    (6): Linear(in_features=4096, out_features=1000, bias=True)
  )
)

Please spend some time to understand the output above

It’s just a simple layers of Convolutional, MaxPooling, and Linear layers. The exact same Conv2D and MaxPool2D layers that we have been using so far. You also have learned kernal size, stride, padding, etc.

Despite its simplicity, AlexNet is monumental! It’s the winner of the 2012 ImageNet Large Scale Visual Recognition Competition (ILSVRC) beating the second place with huge gap: The network achieved a top-5 error of 15.3%, more than 10.8% points lower than that of the runner up.

VGG16

import torchvision.models as models

vgg16 = models.vgg16(weights=None)
print(vgg16)
VGG(
  (features): Sequential(
    (0): Conv2d(3, 64, kernel_size=(3, 3), stride=(1, 1), padding=(1, 1))
    (1): ReLU(inplace=True)
    (2): Conv2d(64, 64, kernel_size=(3, 3), stride=(1, 1), padding=(1, 1))
    (3): ReLU(inplace=True)
    (4): MaxPool2d(kernel_size=2, stride=2, padding=0, dilation=1, ceil_mode=False)
    (5): Conv2d(64, 128, kernel_size=(3, 3), stride=(1, 1), padding=(1, 1))
    (6): ReLU(inplace=True)
    (7): Conv2d(128, 128, kernel_size=(3, 3), stride=(1, 1), padding=(1, 1))
    (8): ReLU(inplace=True)
    (9): MaxPool2d(kernel_size=2, stride=2, padding=0, dilation=1, ceil_mode=False)
    (10): Conv2d(128, 256, kernel_size=(3, 3), stride=(1, 1), padding=(1, 1))
    (11): ReLU(inplace=True)
    (12): Conv2d(256, 256, kernel_size=(3, 3), stride=(1, 1), padding=(1, 1))
    (13): ReLU(inplace=True)
    (14): Conv2d(256, 256, kernel_size=(3, 3), stride=(1, 1), padding=(1, 1))
    (15): ReLU(inplace=True)
    (16): MaxPool2d(kernel_size=2, stride=2, padding=0, dilation=1, ceil_mode=False)
    (17): Conv2d(256, 512, kernel_size=(3, 3), stride=(1, 1), padding=(1, 1))
    (18): ReLU(inplace=True)
    (19): Conv2d(512, 512, kernel_size=(3, 3), stride=(1, 1), padding=(1, 1))
    (20): ReLU(inplace=True)
    (21): Conv2d(512, 512, kernel_size=(3, 3), stride=(1, 1), padding=(1, 1))
    (22): ReLU(inplace=True)
    (23): MaxPool2d(kernel_size=2, stride=2, padding=0, dilation=1, ceil_mode=False)
    (24): Conv2d(512, 512, kernel_size=(3, 3), stride=(1, 1), padding=(1, 1))
    (25): ReLU(inplace=True)
    (26): Conv2d(512, 512, kernel_size=(3, 3), stride=(1, 1), padding=(1, 1))
    (27): ReLU(inplace=True)
    (28): Conv2d(512, 512, kernel_size=(3, 3), stride=(1, 1), padding=(1, 1))
    (29): ReLU(inplace=True)
    (30): MaxPool2d(kernel_size=2, stride=2, padding=0, dilation=1, ceil_mode=False)
  )
  (avgpool): AdaptiveAvgPool2d(output_size=(7, 7))
  (classifier): Sequential(
    (0): Linear(in_features=25088, out_features=4096, bias=True)
    (1): ReLU(inplace=True)
    (2): Dropout(p=0.5, inplace=False)
    (3): Linear(in_features=4096, out_features=4096, bias=True)
    (4): ReLU(inplace=True)
    (5): Dropout(p=0.5, inplace=False)
    (6): Linear(in_features=4096, out_features=1000, bias=True)
  )
)
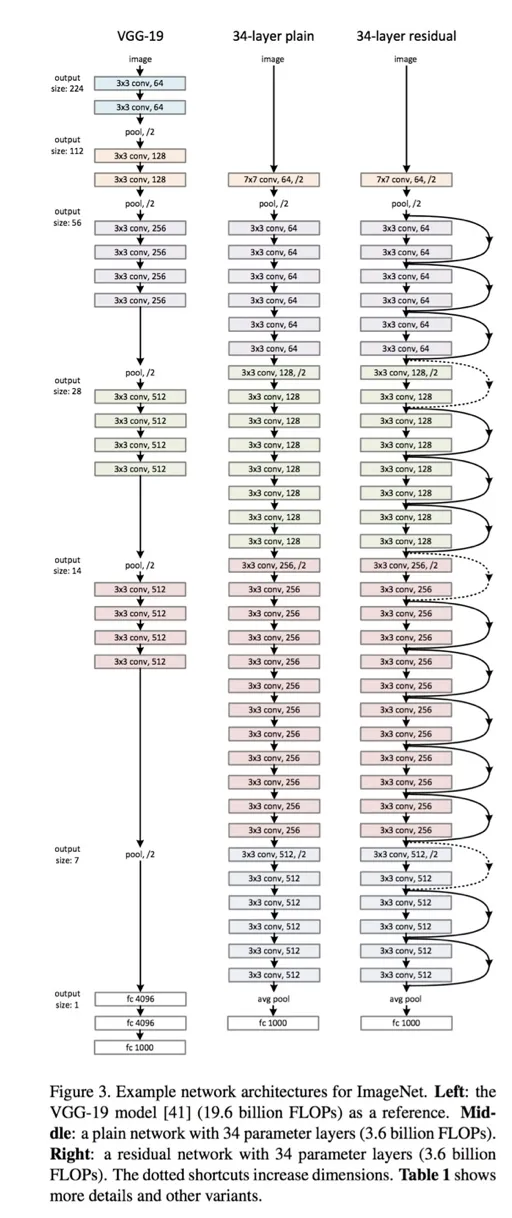
You should be able to understand the output above, only Conv2d, MaxPool2d, and Linear layers!

ResNet

ResNet is a very deep CNN model, it has 152 layers! (compare it to AlexNet which only has 8 layers)

It’s the winner of the 2015 ImageNet competition

resnet

Residual Network

The special thing about ResNet is the skip connection, which is the addition of the input to the output of the stacked layers.

The output of layer \(i\)-th is passed to layer \(i+2\)-th, this is called skip connection.

\[ a^{[l+2]} = g(z^{[l+2]} + a^{[l]}) \]

ResBlock

The problem with deep neural network is that it’s hard to train, the gradient vanishing problem, i.e. the gradient becomes smaller and smaller as it goes deeper and deeper resulting in the weights of the earlier layers don’t get updated much.

The skip connection solves this problem by passing the output of the earlier layers to the deeper layers, so the gradient doesn’t vanish.

We can implement the skip connection in PyTorch by adding the input to the output of the layer (before ReLU):

import torch
from torch import nn

class ResidualBlock(nn.Module):
    def __init__(self, in_channels, out_channels, stride=1):
        super(ResidualBlock, self).__init__()
      
        # Convolutional layers 
        self.conv1 = nn.Conv2d(in_channels, out_channels, kernel_size=3, 
                               stride=stride, padding=1, bias=False)
        self.bn1 = nn.BatchNorm2d(out_channels)
        self.conv2 = nn.Conv2d(out_channels, out_channels, kernel_size=3, 
                               stride=1, padding=1, bias=False)
        self.bn2 = nn.BatchNorm2d(out_channels)

        # Skip connection
        self.skip = nn.Sequential()
        if stride != 1 or in_channels != out_channels:
            self.skip = nn.Sequential(
                nn.Conv2d(in_channels, out_channels, kernel_size=1, stride=stride, bias=False),
                nn.BatchNorm2d(out_channels)
            )

    def forward(self, x):
        out = torch.relu(self.bn1(self.conv1(x)))
        out = self.bn2(self.conv2(out))
        out += self.skip(x)  # Skip connection
        out = torch.relu(out)
        return out

Above is the implementation of ResNet, you can see the skip connection in the forward method.

Put attention to this part:

out += self.skip(x)

x is the original input. It’s not the output from the previous layer:

out = self.skip(out)

Fine tuning

Before we go into Applied CNN next, let’s do a quick fine tuning/transfer learning on CNN. We’ll use Resnet18 and the CIFAR10 dataset. ResNet-18 is a convolutional neural network that is 18 layers deep. And it’s pretrained on more than a million images from the ImageNet database.

For the last step we will save our trained model and use it without training it every time, let’s see how that’s done:

import torchvision.datasets as datasets
import torchvision.transforms as transforms

# Define the transforms
transform = transforms.Compose([
    transforms.ToTensor(),
    transforms.Normalize((0.5, 0.5, 0.5), (0.5, 0.5, 0.5))
])

# Download the dataset
train_dataset = datasets.CIFAR10(root='./data', train=True, download=True, transform=transform)
test_dataset = datasets.CIFAR10(root='./data', train=False, download=True, transform=transform)

import torch
import torch.nn as nn
import torch.optim as optim
from torchvision.models import resnet18

# Define the model
model = resnet18(weights='DEFAULT')
num_ftrs = model.fc.in_features
model.fc = nn.Linear(num_ftrs, 1000)

# Define the loss function and optimizer
criterion = nn.CrossEntropyLoss()
optimizer = optim.SGD(model.parameters(), lr=0.001, momentum=0.9)

from torch.utils.data import DataLoader

# Define the batch size and number of epochs
batch_size = 32
num_epochs = 1

# Create the data loaders
train_loader = DataLoader(train_dataset, batch_size=batch_size, shuffle=True)
test_loader = DataLoader(test_dataset, batch_size=batch_size, shuffle=False)

# Train the model
for epoch in range(num_epochs):
    running_loss = 0.0
    for i, (images, labels) in enumerate(train_loader):
        # Zero the gradients
        optimizer.zero_grad()

        # Forward pass
        outputs = model(images)

        # Calculate the loss
        loss = criterion(outputs, labels)

        # Backward pass
        loss.backward()

        # Update the weights
        optimizer.step()

        # Print statistics
        running_loss += loss.item()
        if (i + 1) % 100 == 0:  # Print every 100 mini-batches
            print(f'Epoch [{epoch + 1}/{num_epochs}], Batch [{i + 1}/{len(train_loader)}], Loss: {running_loss / 100:.4f}')
            running_loss = 0.0

    # Test the model
    correct = 0
    total = 0
    with torch.no_grad():
        for images, labels in test_loader:
            outputs = model(images)
            _, predicted = torch.max(outputs.data, 1)
            total += labels.size(0)
            correct += (predicted == labels).sum().item()

    # Print the accuracy
    print('Epoch [{}/{}], Test Accuracy: {:.2f}%'.format(epoch+1, num_epochs, 100*correct/total))

# Save the trained model to a file
torch.save(model.state_dict(), 'resnet18_cifar10_classifier.pth')
print('Model saved')
Files already downloaded and verified
Epoch [1/1], Batch [100/1563], Loss: 2.4852
Epoch [1/1], Batch [200/1563], Loss: 1.3526
Epoch [1/1], Batch [300/1563], Loss: 1.2018
Epoch [1/1], Batch [400/1563], Loss: 1.0929
Epoch [1/1], Batch [500/1563], Loss: 1.0548
Epoch [1/1], Batch [600/1563], Loss: 1.0232
Epoch [1/1], Batch [700/1563], Loss: 0.9527
Epoch [1/1], Batch [800/1563], Loss: 0.9520
Epoch [1/1], Batch [900/1563], Loss: 0.9351
Epoch [1/1], Batch [1000/1563], Loss: 0.8726
Epoch [1/1], Batch [1100/1563], Loss: 0.8719
Epoch [1/1], Batch [1200/1563], Loss: 0.8006
Epoch [1/1], Batch [1300/1563], Loss: 0.8739
Epoch [1/1], Batch [1400/1563], Loss: 0.8623
Epoch [1/1], Batch [1500/1563], Loss: 0.7862
Epoch [1/1], Test Accuracy: 72.49%
Model saved

Let’s try out our model with an image from the internet:

import torch
import torchvision.models as models
import requests
from PIL import Image
from torchvision import transforms
import io

# Load the model architecture (e.g., ResNet18)
model = models.resnet18(weights=None)

# Load the saved model weights
model_weights_path = 'resnet18_cifar10_classifier.pth'  # Path to the saved model weights on your local disk
model.load_state_dict(torch.load(model_weights_path))

# Put the model in evaluation mode
model.eval()

# URL of the image you want to classify
#image_url = 'https://upload.wikimedia.org/wikipedia/commons/thumb/1/1a/200125-N-LH674-1073_USS_Theodore_Roosevelt_%28CVN-71%29.jpg/1200px-200125-N-LH674-1073_USS_Theodore_Roosevelt_%28CVN-71%29.jpg'  # aircraft carrier
image_url = 'https://akm-img-a-in.tosshub.com/businesstoday/images/assets/202307/16-17-1-sixteen_nine.jpg?size=948:533' #airplane

# Download the image from the URL
response = requests.get(image_url)

if response.status_code == 200:
    # Open the downloaded image with PIL
    img = Image.open(io.BytesIO(response.content))
else:
    print('Failed to download the image.')

# Apply the same transformations used during training (resize, normalize, etc.)
transform = transforms.Compose([
    transforms.Resize((32, 32)),  # Resize to match model's input size, CIFAR10 was 32x32, try commenting this and see if the prediction is still correct
    transforms.ToTensor(),
    transforms.Normalize((0.5, 0.5, 0.5), (0.5, 0.5, 0.5)),
])

input_data = transform(img).unsqueeze(0)  # Add a batch dimension

#We use CIFAR10 labels
class_to_label = {0: 'airplane', 1: 'automobile', 2: 'bird', 3: 'cat', 4: 'deer', 5: 'dog', 6: 'frog', 7: 'horse', 8: 'ship', 9: 'truck'}

with torch.no_grad():
    output = model(input_data)

# Get the predicted class label
_, predicted_class = torch.max(output, 1)

# Print the predicted class
print('Predicted Class:', predicted_class.item())
print('Predicted Label:', class_to_label[predicted_class.item()])
Predicted Class: 0
Predicted Label: airplane
Back to top