Introduction to Docker
One of the problem associated with collaborative work is caused by inconsistent environment. For example, you as an AI engineer is working on a Machine Learning (ML) model that works in your Windows environment, producing a model.exe file. The company server however runs on Linux, your AI engineer colleague, Dito is working with a MacOS environment and your model.exe doesn’t work on non-Windows environment. Then there is also the module dependency issues, installing them one-by-one for each and every computer is such a hassle.
This is where Docker comes in handy. Docker is an open-source platform that utilizes OS-level virtualization to deliver software in packages called containers. It has become a popular tool among developers, including AI engineers and system administrators due to its ability to guarantee consistency across multiple development and release cycles.
Benefits of Using Docker Containers
There are several key benefits to using Docker containers:
- Portability: Docker containers can run on any computer, on any infrastructure and in any cloud.
- Version Control: Each update to a Docker container is a new version, which can be rolled back to if necessary.
- Isolation: Docker ensures your applications and resources are isolated and segregated.
- Lightweight: Docker images are small, which facilitates easy scaling and rapid delivery.
- Scalability: Docker can be integrated with orchestration tools like Kubernetes for automated deployment, scaling, and management of containerized applications.
In summary, Docker enables developers to easily pack, ship, and run any application as a lightweight, portable, self-sufficient container, which can run virtually anywhere. Containers are completely sandboxed and do not interface directly with the host OS, this ensures that they run uniformly, regardless of where they are deployed.
Docker Terminology
Before we go into practical usage for Docker, let’s review two essential Docker terminology first:
Images: These are read-only templates with instructions for creating a Docker container. They can be based on other images and can have version tags.
Containers: A runnable instance of an image. You can create, start, stop, move, or delete a container using the Docker API or CLI. You can connect a container to one or more networks, attach storage to it, or even create a new image based on its current state.
What is the difference between Images and Containers? Let’s use an analogy of food, “recipe” and “dishes”: - Docker images are like a recipe for a dish, containing a list of ingredients and steps to make it. They are static and unchangeable, yet can be shared and used to recreate the same dish anywhere. - Docker containers, on the other hand, are like the actual dishes prepared from the recipe. They are dynamic, can be started or stopped at any time, and don’t affect or interfere with other dishes (containers). All dishes made from the same recipe will have the same taste and nutrients, just like all containers created from the same Docker image will have the same software.
Now, when we create a container, Docker will use an image which is automatically downloaded from the internet. This image is stored locally in our computer or our server if we are deploying to a server. Because an image is used like a recipe, there is only one needed in a local computer. We can created basically unlimited number of containers.
Now, let’s put the knowledge into practical use!
Setting Up Docker
After understanding the basic concepts and benefits of Docker, let’s move on to setting it up on your system. This involves installation, configuration, downloading and running Docker images, and some basic Docker commands.
Installation and Configuration of Docker on Your System
Installation of Docker differs based on the operating system you are using.
For Linux: Docker provides a convenient script for installation on Linux systems. You can download and execute this script using the command below:
curl -fsSL https://get.docker.com -o get-docker.sh
sudo sh get-docker.sh
For Windows and Mac: Docker Desktop is an easy-to-install application for your Mac or Windows environment that enables you to start coding and containerizing in minutes. Download Docker Desktop from the Docker Hub.
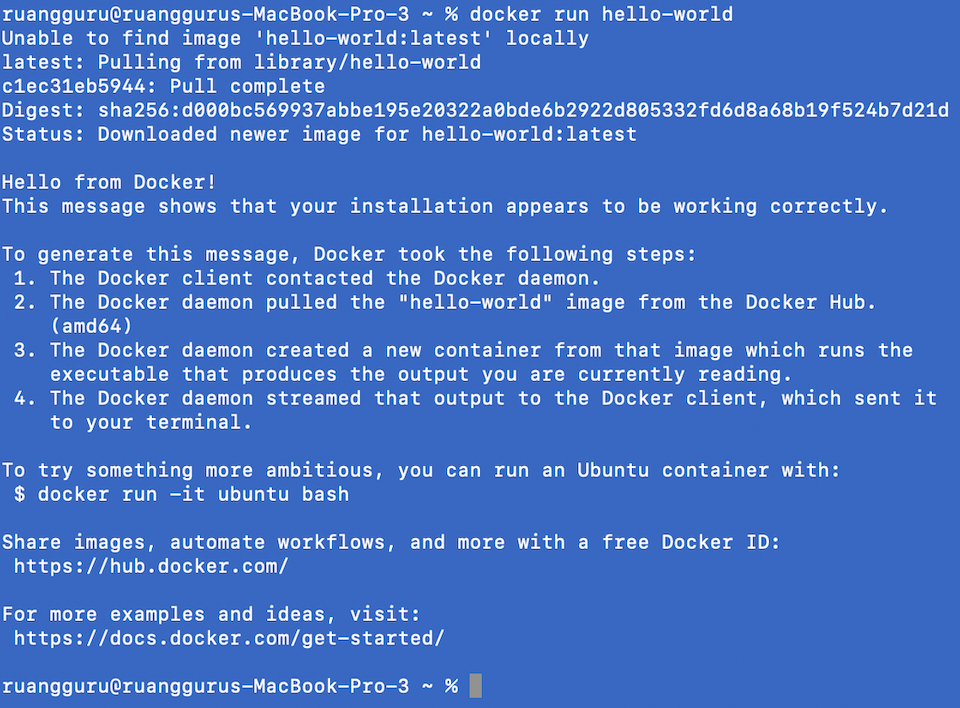
Once Docker is installed, you can confirm that it’s working correctly by running: docker run hello-world.
Downloading and Running Docker Images
The Docker ecosystem have evolved so much that we don’t have to build the image ourselves, we can simply download Docker images from a registry such as Docker Hub. Once you have an image, you can launch a container from it. Let’s try running a Jupyter Notebook inside Docker:
docker run -p 8888:8888 -d --name myjupyter jupyter/base-notebookThis command tells Docker to run a new container in detached mode (-d) using the jupyter/base-notebook image. The -p option maps port 8080 on the host to port 80 on the container. The --name option gives a name to the container.
This command instructs Docker to run a new container in detached mode (-d) using the jupyter/base-notebook image. The -p option maps port 8888 on the host to port 8888 on the Jupyter notebook server running inside the container. The --name option provides a name for the container, in our case it’s myjupyter. Feel free to change the name for the container.
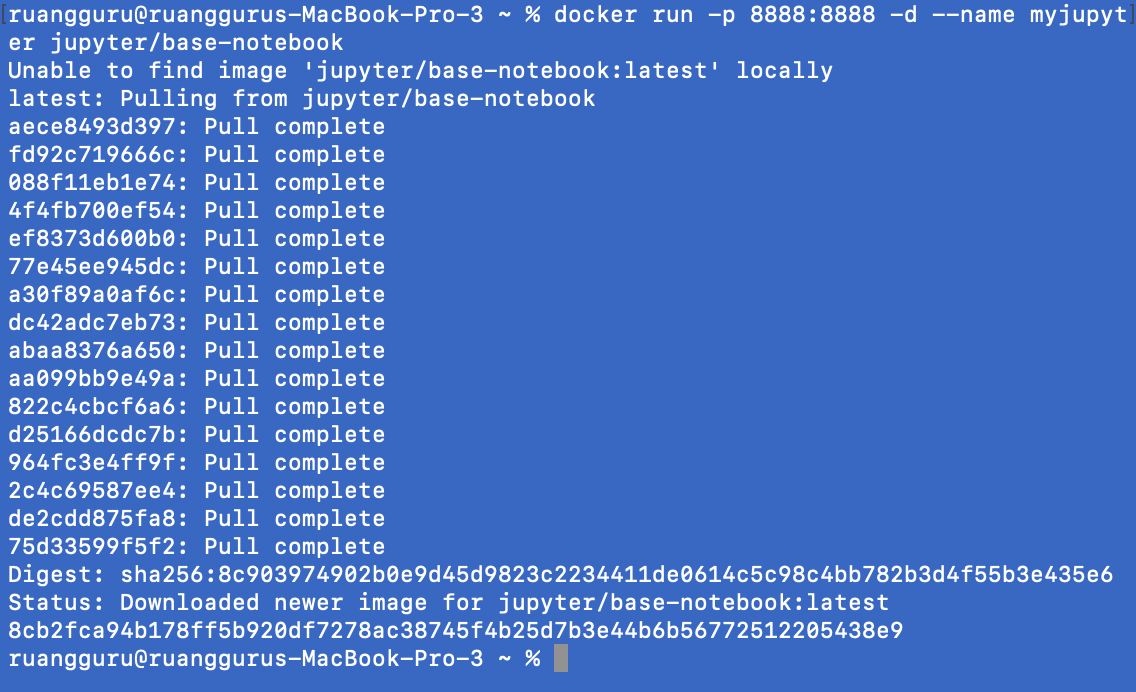
When you run this, the Jupyter Notebook server gets started inside the container at port 8888. It’s accessible from your host machine at localhost:8888.
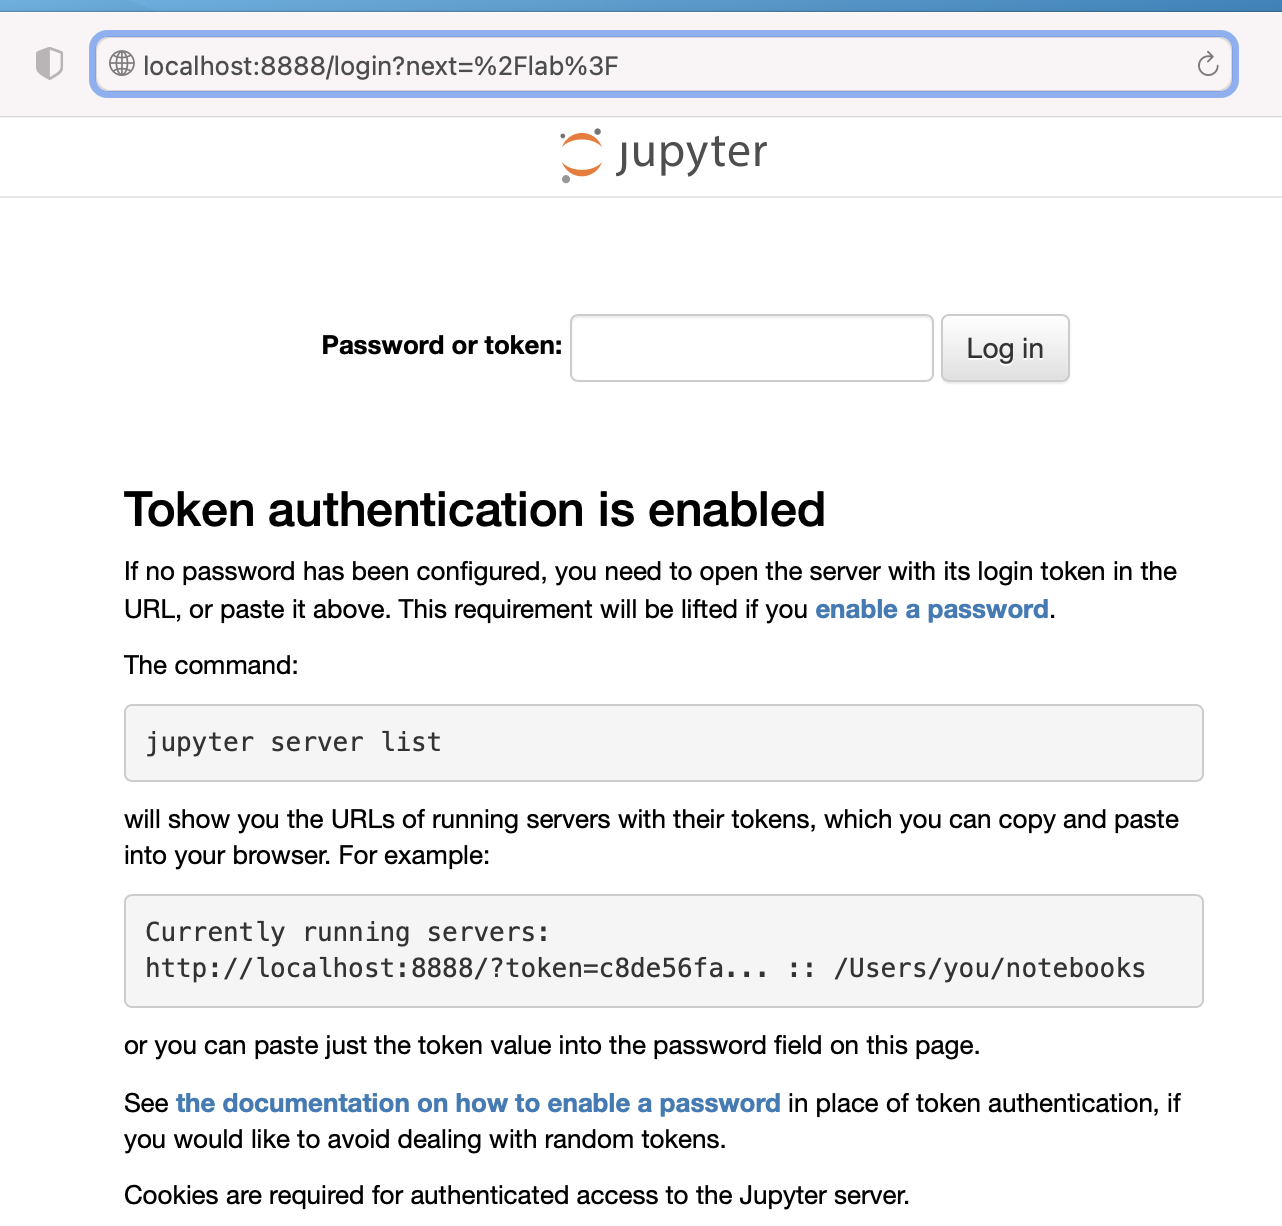
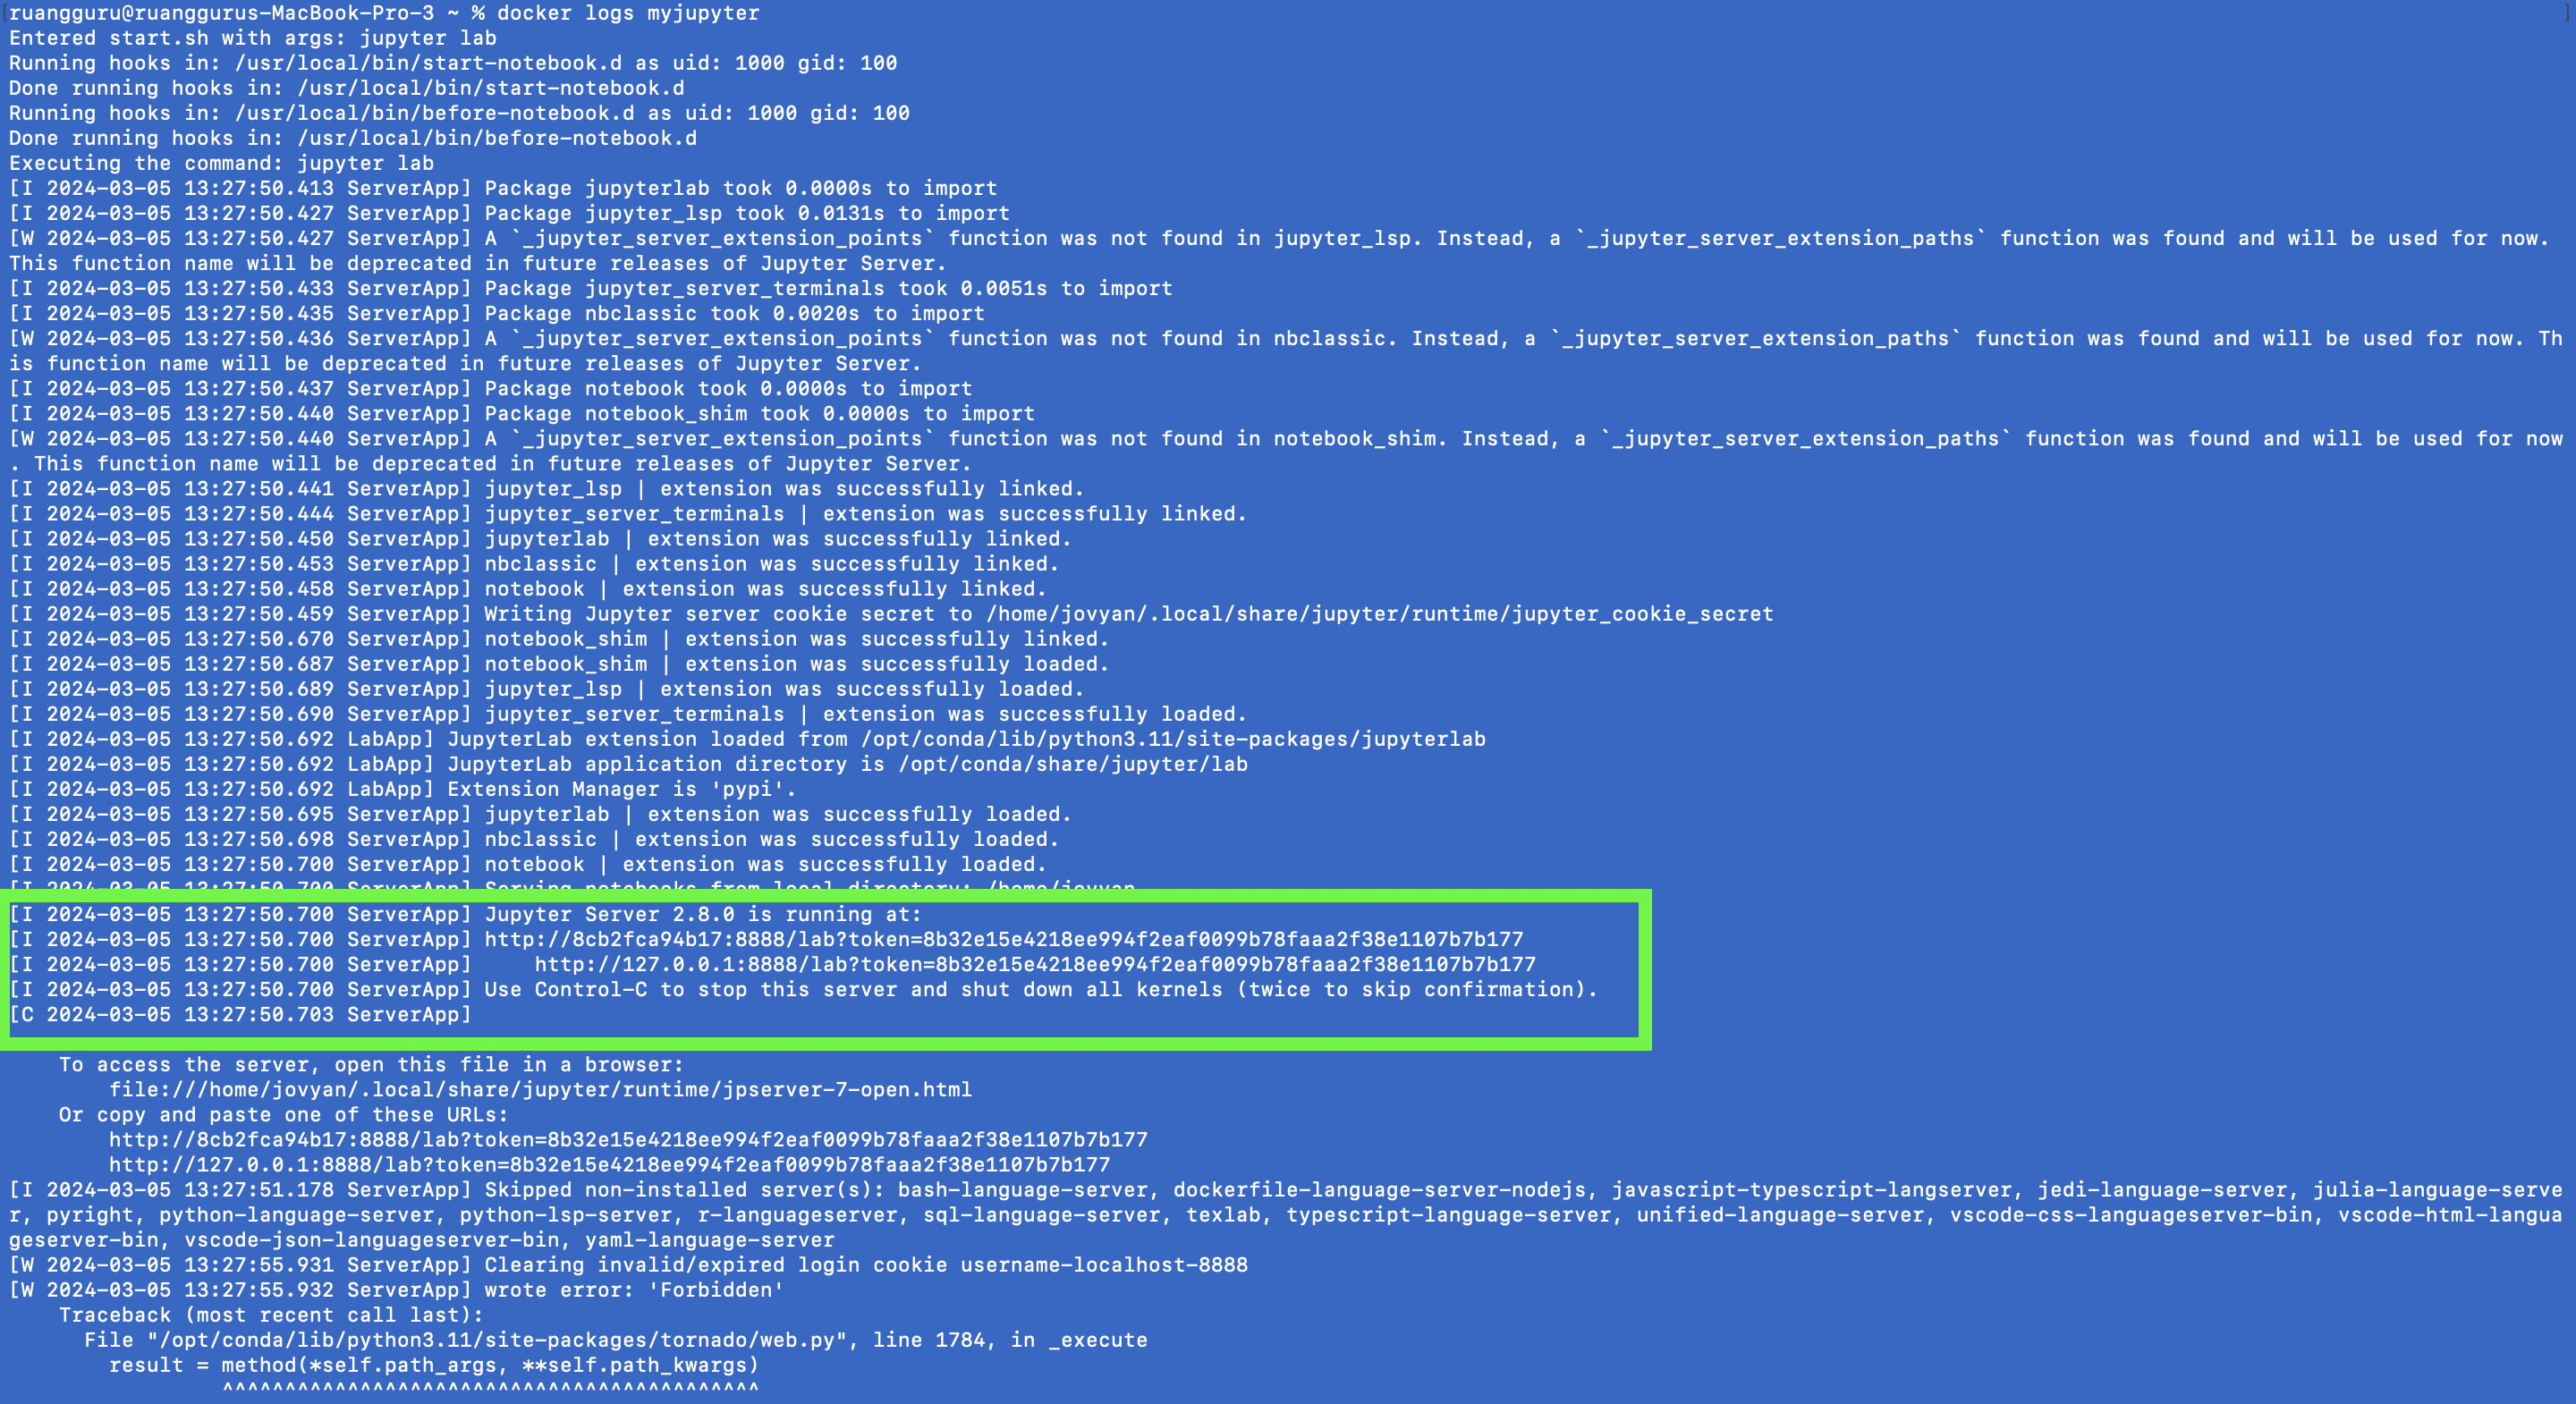
Please note that when you run this command, the Jupyter Notebook server is started in the container and a token is generated. You will need this token to log in to the Jupyter Notebook server. You can see the token in the console logs by running:
docker logs myjupyterThe console will output a URL that contains the token to access the Jupyter notebook.
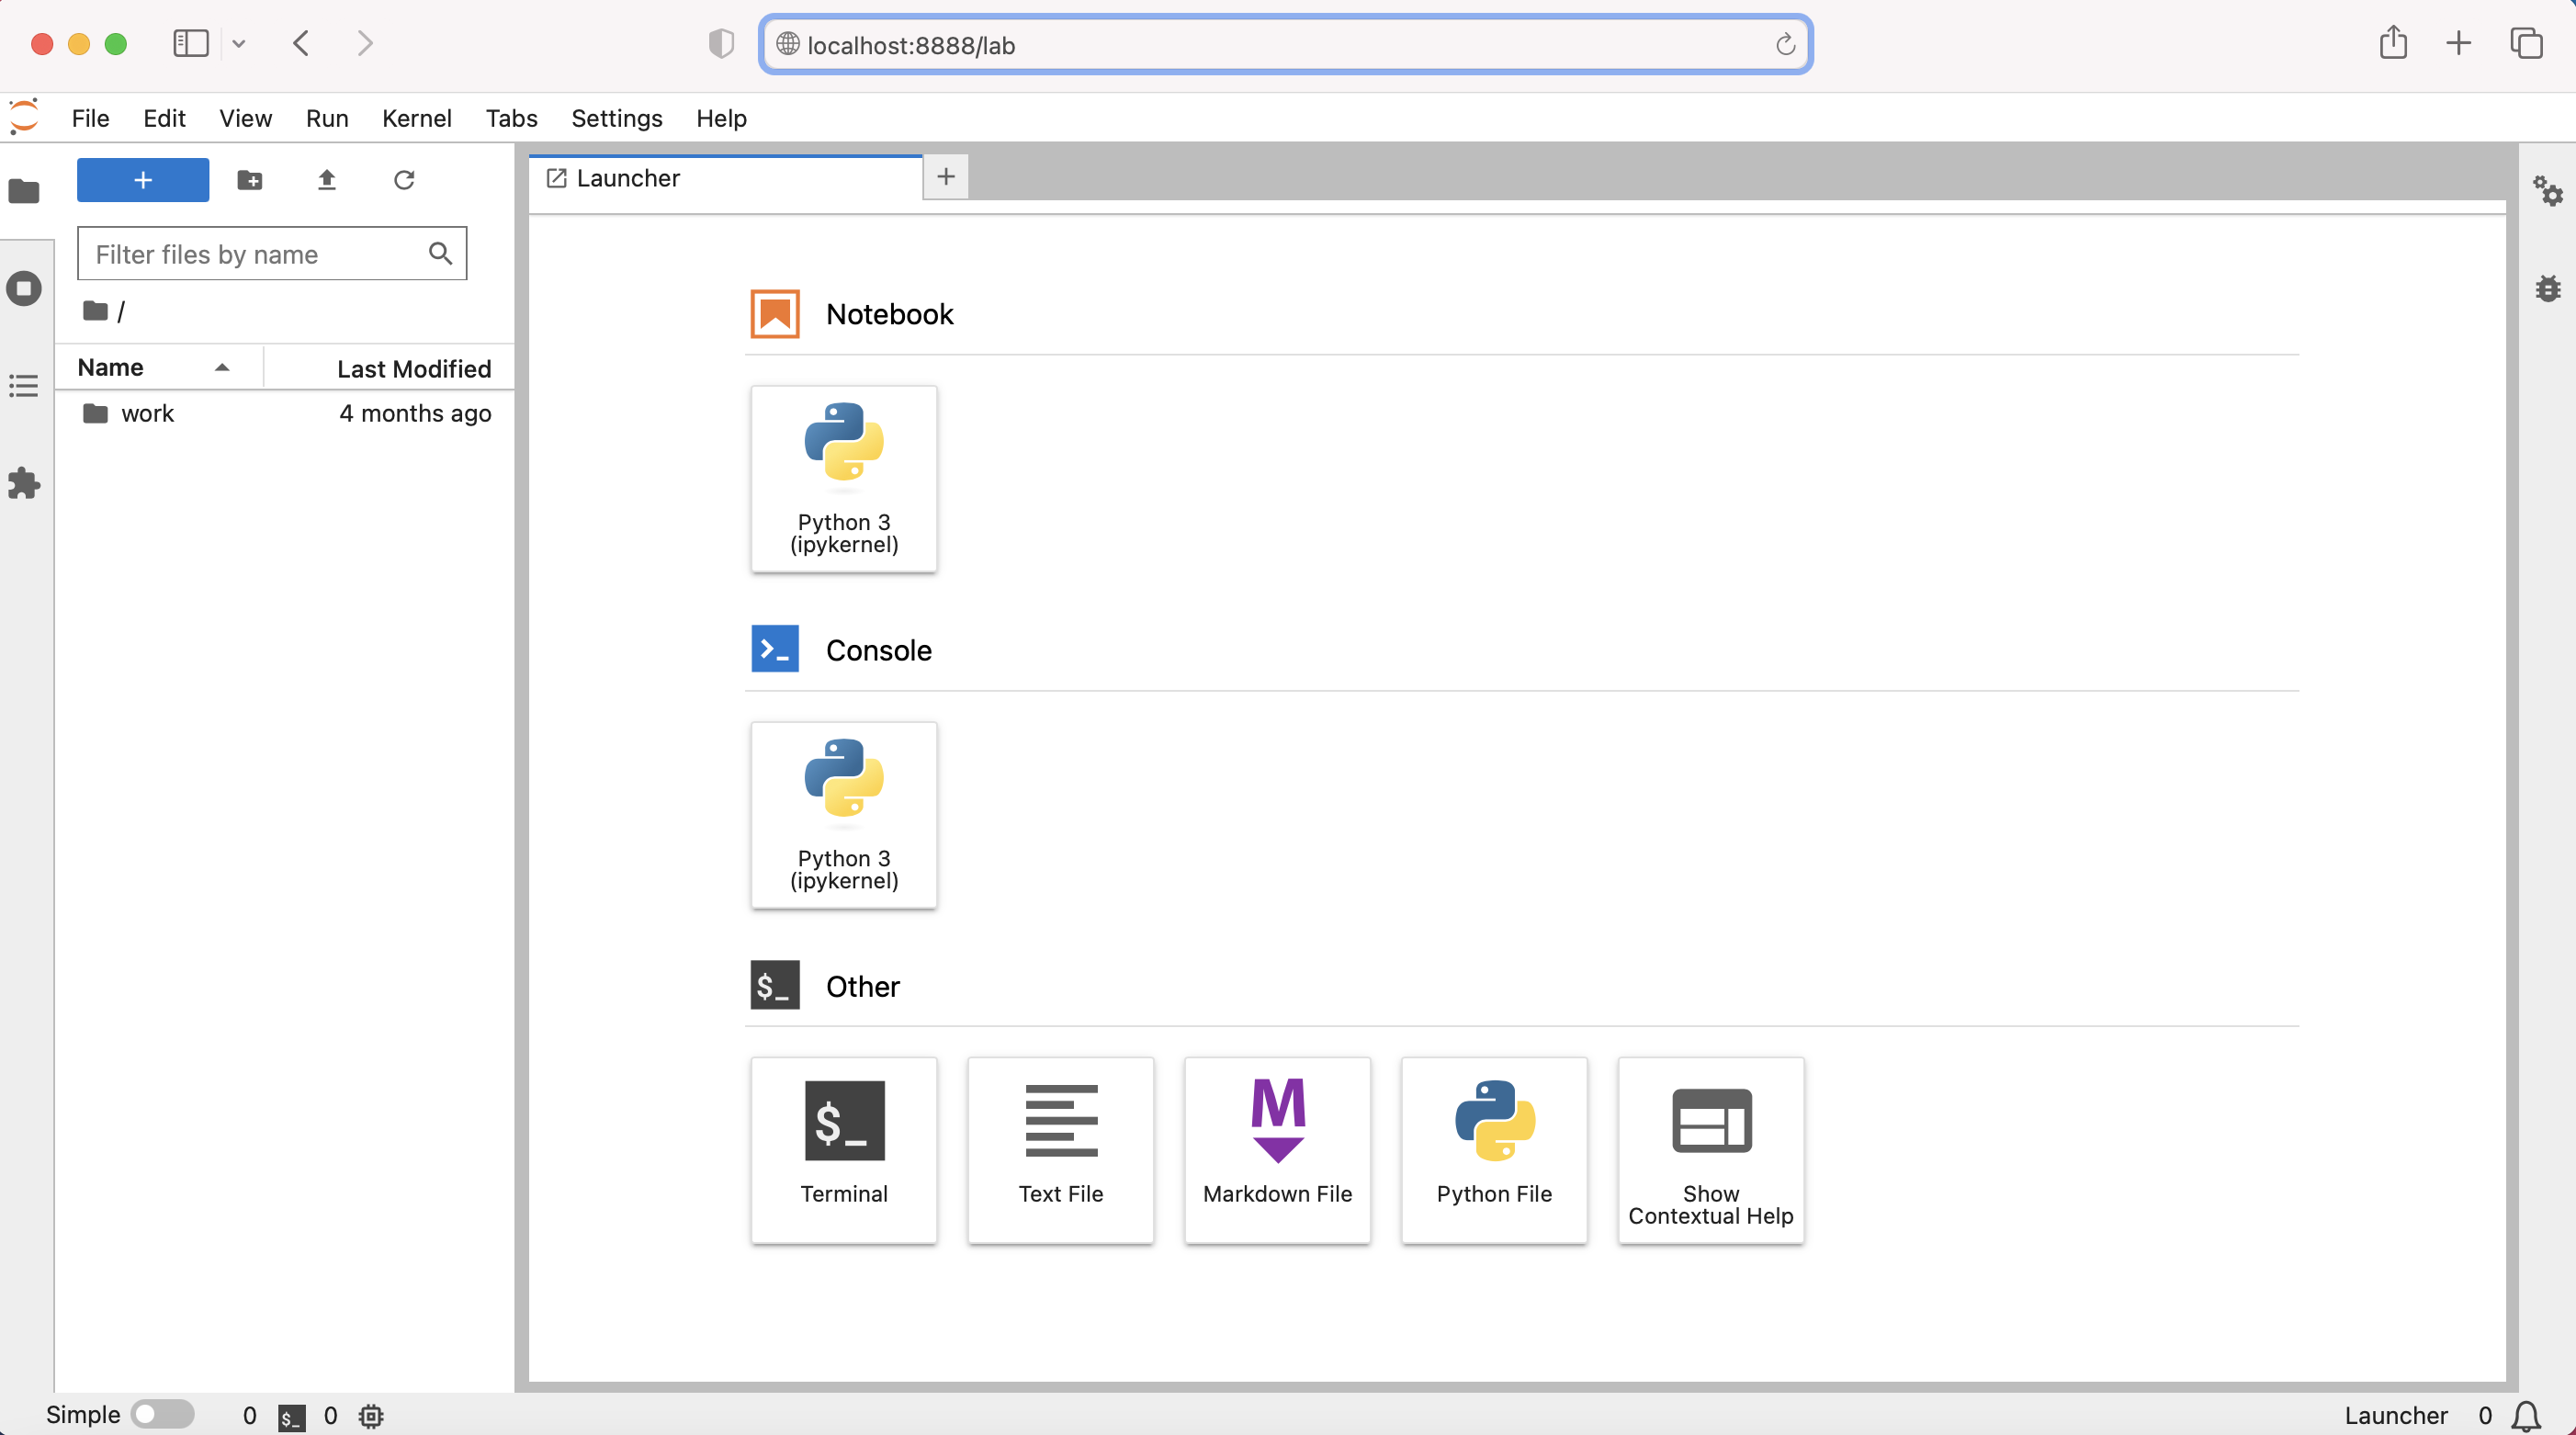
We can input the token into the login page and we should arrive at this page:
Basic Docker Commands
Let’s run through some basic Docker commands that you’ll most likely use on a regular basis. Don’t worry, we’ll walk you through each of these commands as we move forward.
Understanding these basic Docker commands is crucial in your Docker journey as they offer the functionality required to manage your containers and images. Consequently, this makes application development more efficient, allowing you to focus more on creating amazing applications.
docker run: This command is used to create a new container from an image.
docker ps: This command is used to list running containers.
docker stop: This command is used to stop a running container.
docker start: This command is used to start a container given the image already exists.
docker rm: This command is used to remove an existing Docker container.
docker images: This command lists all images on the local system.
docker rmi: This command is used to remove Docker images.
docker build: This command is used to build Docker images from a Dockerfile.
Now, let’s do a walkthrough of all the above docker commands, except for docker build, we’ll go through it the next notebook. Make sure docker is running in your system, if not, please consult the following documentation to get it started: Start the Docker Daemon Documentation
docker run
We already see this in action above, what this command does is actually it will download the image from the internet, usually via Docker Hub. To do this it actually calls a docker command called docker pull, which we won’t go into detail right now. Once the image is downloaded, Docker will then create a container using the image and run the container.
Let’s review some of the command flags that’s commonly used: - -d flag = detached mode. This means to run the container and once the container is running, Docker will return the terminal back to us. This way we can then use the terminal to input other commands, such as docker ps to check the running containers. Without the -d flag, the terminal will appear to “hang up” because it’s being used by the Docker container. - -p flag = port mapping. This flag is used commonly like this: -p 8888:8888 which means we want to map the host port of 8888 at the front with the container port of 8888 at the back. This allows for some customization. Let’s say for example, the host port of 8888 is taken, we can then map the host port to another empty port, such as 8889. Thus the flag becomes -p 8889:8888. - --name flag = naming the container. This flag is used to create a text identifier which is easier to remember for human, compared to the alphanumeric ID of the container.
In choosing a port for use by Docker container, keep in mind that port below 1024 is reserved, so you must not use it, because it may interfere with the working of your computer.
docker ps
When we want to know what containers are running in our system, we use docker ps to list all running containers. Since we still have our Jupyter Notebook running, when we run this command, we should get something like this:

The terminal is a bit small, so the information is divided into two lines. Here’s the pair of information: | Key | Value | |——–|——–| | CONTAINER ID | 9af65e58e9df | | IMAGE | jupyter/base-notebook | | COMMAND | “tini -g – start-no…” | | CREATED | 13 seconds ago | | STATUS | Up 12 seconds (healthy) | | PORTS | 0.0.0.0:8888->8888/tcp | | NAMES | myjupyter |
Note that your information Value may be different because the data is unique to each computer.
Now, docker ps only shows activly running container, to list all container, we need to pass the switch -a, like this:
docker ps -aHere’s what it looks like:

docker stop
To stop a running container, we use docker stop followed by either the Container ID or Container Name. Using our prior example, we can issue the following command:
docker stop myjupyterWhere myjupyter is the name of our container. We can then check if the container is no longer running using docker ps
Here’s what it looks like:

Note that I deliberately add extra lines so you can clearly see what each command output is. As you can see, docker ps no longer contains anything.
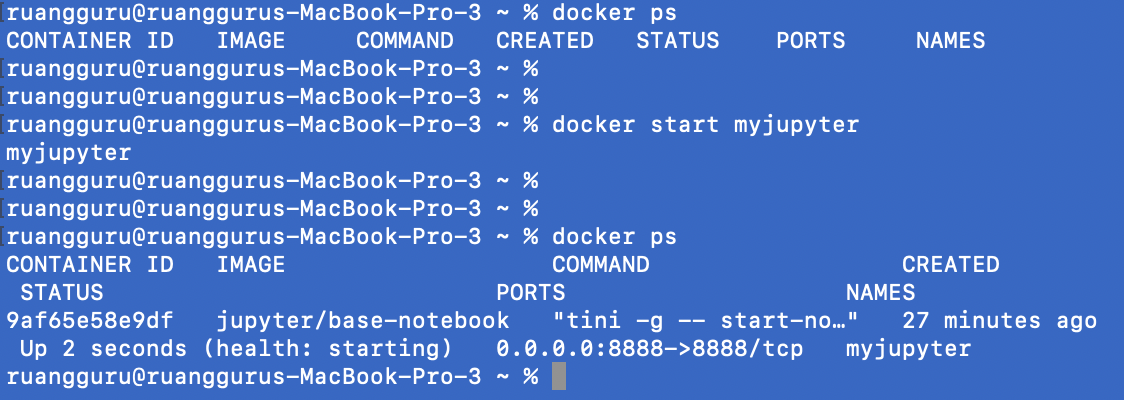
docker start
We can start a container that already exists in our local Docker image using docker start. We’ll cover Docker image after this, please bear with me for a while.
If you recall, we give a name to our container myjupyter which we set when we set up using docker run and we also use the name when we stop the container. We can also use the name to start a container.
docker start myjupyterHere’s what it looks like:
docker rm
This command is used when we want to save disk space because this will delete the container from the hard disk. Once this is done, we cannot use docker start, instead we have to use docker run to reinstall the container. This is useful if for example we have a new version of jupyter notebook that we want to try out before using it for our AI application. Once we finish the try out, we can then either move our AI application to the new version and delete the old version or vice versa.
To remove a container, we can simply issue the command using the name of the container, alternatively we can also use the Container ID.
Note that in order to remove a container we have to stop the container first.
docker rm myjupyterHere’s what it looks like:

docker images
Since images and containers are two different objects, we have different commands for images.
To see what images are available in our computer, we can run:
docker imagesLet’s see what it looks like:

As you can see, we have jupyter/base-notebook image which is used for creating our container named myjupyter earlier. There is also the hello-world image. There are also other Docker images which are created in the author’s computer.
docker rmi
Keep in mind that both containers and images takes up disk space, so we may want to delete them once we no longer use them. We already know how to remove a container, we can do the same with images. We run the the command docker rmi followed by the Image Name or ID which we can get from the docker images command. The Image Name is listed under Repository
Let’s say we want to delete hello-world image:
docker rmi hello-worldYou may encounter some error when deleting, make sure that you have stopped and removed the container that uses the image first. Use docker ps -a to list all the containers, not just active ones.
Now, here’s what the result looks like:

Now that we know how Docker works, let’s head over to the next notebook, where we will create our own Docker image. Using docker build of course.