!pip install diffusers==0.14
!pip install -q accelerate transformers xformersControlNet with Stable Diffusion
This ControlNet is considered another way to guide the results in terms of composition and general of the image, as we have learned before.
As we know, it is possible to generate images from text, from images, and even by training custom model. However, Control Net introduces a new way to guide the generation of images, for example, we can control the Depth to Image, where both a text prompt and a depth image are used to condition the model. This allows you to get even more accurate results than the common image-to-image technique.
About the technique
- Paper Adding Conditional Control to Text-to-Image Diffusion Models published in February 2023
- ControlNet was developed from the idea that only text is not enough to solve all problems in image generation.
- First version: https://github.com/lllyasviel/ControlNet#below-is-controlnet-10
- Diagram and additional explanation: https://github.com/lllyasviel/ControlNet#stable-diffusion–controlnet
Paper: https://arxiv.org/pdf/2302.05543.pdf
ControlNet is a method used to manage the behavior of a neural network. It does this by adjusting the input conditions of the building blocks of the neural network, which are called network blocks. For example, in a restnet pretrained CNN model, residual network is a network block.
ControlNet 1.0

The image illustrates how to apply a ControlNet to any neural network block.
The
xandyrepresent deep features in neural networks. These are the complex representations that the network learns from the input data.The
+symbol refers to feature addition, which is a way of combining the information from different features.The
crepresents an extra condition that is added to the neural network. This could be any additional information that you want the network to consider when making its predictions.
In implementing ControlNet, there are various techniques that can be used to condition the model. However, for this discussion, the focus will be on two specific methods:
- Edge Detection using Canny Edge
This technique involves identifying the boundaries of objects within an image. The Canny Edge Detection method is a popular algorithm that’s used to detect a wide range of edges in images. It’s used to help the model understand the shapes present in the input.
- Pose Estimation using Open Pose
This technique is about understanding the pose of a person in an image or video. Open Pose is a library that allows for real-time multi-person keypoint detection. It can identify where people are and how they are posed in an image or video. This information can be used to condition the model to understand and learn from the poses present in the input.
For more detailed information about implementing ControlNet and the various techniques used to condition the model, you can refer to the ControlNet GitHub repository. This resource provides comprehensive documentation, code examples, and further reading to help you understand and implement ControlNet effectively.
Installing the libraries
opencv-contrib-pythonis a library for computer vision tasks, including edge detection using the Canny edge algorithm.controlnet-auxis a library that contains auxiliary functions for the Control Net model.
!pip install -q opencv-contrib-python
!pip install -q controlnet_aux
from diffusers import StableDiffusionControlNetPipeline, ControlNetModel
import torch
import cv2
from PIL import Image
import numpy as np#function show image as grid
def grid_img(imgs, rows=1, cols=3, scale=1):
assert len(imgs) == rows * cols
w, h = imgs[0].size
w, h = int(w*scale), int(h*scale)
grid = Image.new('RGB', size=(cols*w, rows*h))
grid_w, grid_h = grid.size
for i, img in enumerate(imgs):
img = img.resize((w,h), Image.ANTIALIAS)
grid.paste(img, box=(i%cols*w, i//cols*h))
return gridGenerating Images Using Edges
ControlNet Model + Canny Edge
This is the algorithm used to extract the edges of images. It will be easier to understand during the implementations.
- More information about the model: https://huggingface.co/lllyasviel/sd-controlnet-canny
We are creating the variable control_net_canny_model with the corresponding link to download it from the repository.
controlnet_canny_model = 'lllyasviel/sd-controlnet-canny'
control_net_canny = ControlNetModel.from_pretrained(controlnet_canny_model, torch_dtype=torch.float16)
pipe = StableDiffusionControlNetPipeline.from_pretrained('runwayml/stable-diffusion-v1-5',
controlnet=control_net_canny,
torch_dtype=torch.float16)from diffusers import UniPCMultistepScheduler
pipe.scheduler = UniPCMultistepScheduler.from_config(pipe.scheduler.config)pipe.enable_attention_slicing()
pipe.enable_xformers_memory_efficient_attention()pipe.enable_model_cpu_offload()Loading the image
Now we can load the image.
- Image source: https://unsplash.com/pt-br/fotografias/OjhSUsHUIYM
img = Image.open('/content/bird2.jpg')
img
Detecting edges using Canny Edge
In this technique, we are going to use the Canny edge algorithm to extract only the borders of the image. So instead of sending the whole image to the algorithm, we are going to send only the borders.
We are going to create a function that will receive as parameter this image and will return the edges. We don’t need to worry about it because OpenCV has a pre-built function, so we just need to call it to extract the edges.
- More about the algorithm: http://justin-liang.com/tutorials/canny/
- More about the implemetation in OpenCV: https://docs.opencv.org/3.4/da/d22/tutorial_py_canny.html
def canny_edge(img, low_threshold = 100, high_threshold = 200):
  img = np.array(img)

  img = cv2.Canny(img, low_threshold, high_threshold)

  img = img[:, :, None]

  img = np.concatenate([img, img, img], axis = 2)

  canny_img = Image.fromarray(img)

  return canny_img
we can visualize the edges.
canny_img = canny_edge(img)
canny_img
we are able to visualize only the edges that have been extracted. Just a reminder that instead of sending the whole image to the algorithm, we are going to send only the edges. Then the algorithm will be able to generate new birds according to the edges.
We create a prompt, a seed for reproducibility, and a generator. Then we call the pipeline, sending the prompt and the edges of the image as parameters.
prompt = "realistic photo of a blue bird with purple details, high quality, natural light"
neg_prompt = ""

seed = 777
generator = torch.Generator(device="cuda").manual_seed(seed)

imgs = pipe(
    prompt,
    canny_img,
    negative_prompt=neg_prompt,
    generator=generator,
    num_inference_steps=20,
)imgs.images[0]
We can see a high-quality image that is related to the edges and is also in accordance with the prompt.
We can perform tests using different prompts and negative prompts.
prompt = ["realistic photo of a blue bird with purple details, high quality, natural light",
          "realistic photo of a bird in new york during autumn, city in the background",
          "oil painting of a black bird in the desert, realistic, vivid, fantasy, surrealist, best quality, extremely detailed",
          "digital painting of a blue bird in space, stars and galaxy in the background, trending on artstation"]

neg_prompt = ["blurred, lowres, bad anatomy, ugly, worst quality, low quality, monochrome, signature"] * len(prompt)

seed = 777
generator = torch.Generator(device="cuda").manual_seed(seed)

imgs = pipe(
    prompt,
    canny_img,
    negative_prompt=neg_prompt,
    generator=generator,
    num_inference_steps=20,
)
grid_img(imgs.images, 1, len(prompt), scale=0.75)DeprecationWarning: ANTIALIAS is deprecated and will be removed in Pillow 10 (2023-07-01). Use LANCZOS or Resampling.LANCZOS instead.
img = img.resize((w,h), Image.ANTIALIAS)
Let’s try with another image
img = Image.open("/content/wolf.jpg")canny_img = canny_edge(img, 200, 255)
grid_img([img, canny_img], 1, 2)DeprecationWarning: ANTIALIAS is deprecated and will be removed in Pillow 10 (2023-07-01). Use LANCZOS or Resampling.LANCZOS instead.
img = img.resize((w,h), Image.ANTIALIAS)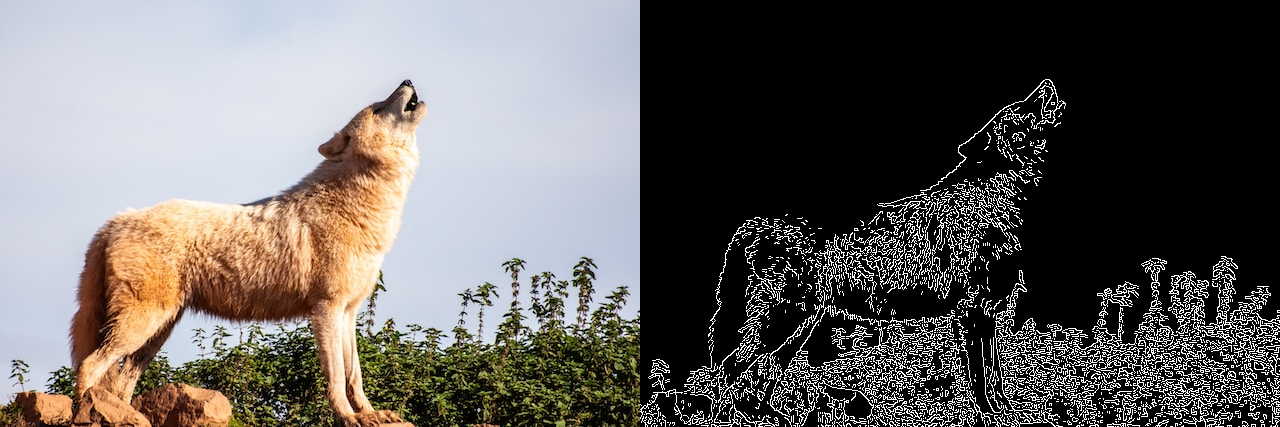
prompt = ["realistic photo of a wolf, high quality, natural light, full moon",
          "realistic photo of a wolf in the snow, best quality, extremely detailed",
          "oil painting of wolf the desert, canyons in the background, realistic, vivid, fantasy, surrealist, best quality, extremely detailed",
          "watercolor painting of a wolf in space, blue and purple tones, stars and earth in the background"]

neg_prompt = ["blurred, lowres, bad anatomy, ugly, worst quality, low quality, monochrome, signature"] * len(prompt)

seed = 777
generator = torch.Generator(device="cuda").manual_seed(seed)

imgs = pipe(
    prompt,
    canny_img,
    negative_prompt=neg_prompt,
    generator=generator,
    num_inference_steps=20,
)
grid_img(imgs.images, 1, len(prompt), scale=0.75)DeprecationWarning: ANTIALIAS is deprecated and will be removed in Pillow 10 (2023-07-01). Use LANCZOS or Resampling.LANCZOS instead.
img = img.resize((w,h), Image.ANTIALIAS)
Generating Images Using Poses
We will learn how to generate images using poses.
If the desired images cannot be found, there are several online 3D software options available for creating posed images:
- 3D software to create posed images:
- Magicposer: https://magicposer.com/
- Posemyart: https://posemy.art/
Loading the model to extract poses
The first step is to download the model from controlnet_aux, a library we will import.
We will also import the OpenposeDetector. We will send an image to this detector and it will return the pose of that image.
from controlnet_aux import OpenposeDetector
pose_model = OpenposeDetector.from_pretrained('lllyasviel/ControlNet')
Extract The Pose
First, the image is loaded. Then, the pose is extracted using the pose_model function.
We will see the pose that has been extracted from the image.
The extracted keypoints represent specific points related to various body parts such as the head, shoulders, arms, hands, legs, feet, and so on.
img_pose = Image.open('/content/pose01.jpg')pose = pose_model(img_pose)
grid_img([img_pose, pose], rows=1, cols=2, scale=0.75)DeprecationWarning: ANTIALIAS is deprecated and will be removed in Pillow 10 (2023-07-01). Use LANCZOS or Resampling.LANCZOS instead.
img = img.resize((w,h), Image.ANTIALIAS)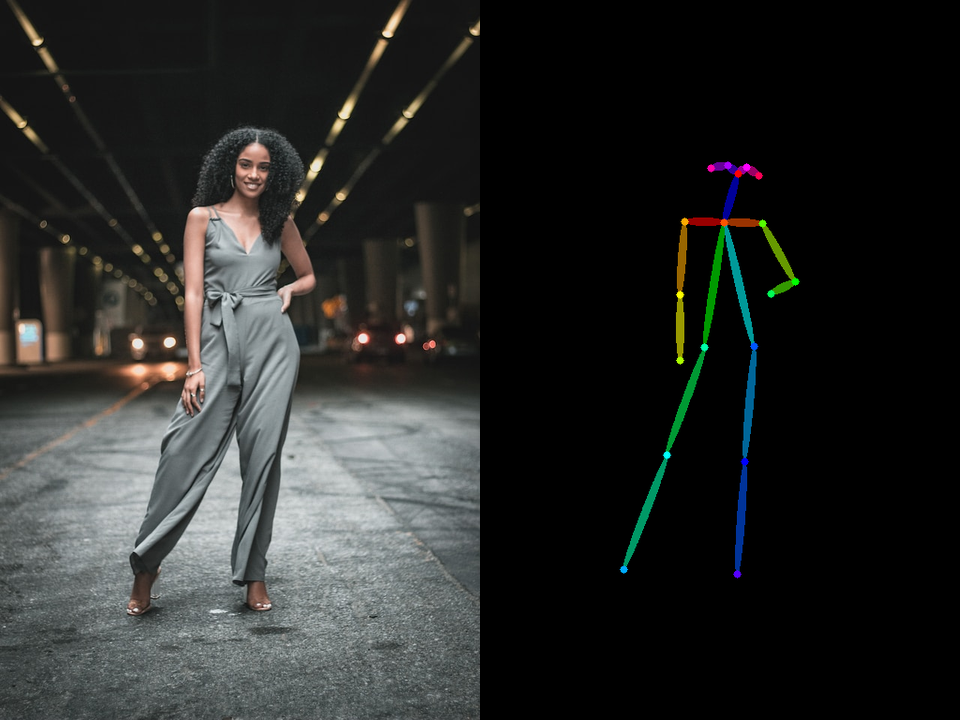
Loading the ControlNet model
The next step is to load the ControlNet model.
controlnet_pose_model = ControlNetModel.from_pretrained('thibaud/controlnet-sd21-openpose-diffusers', torch_dtype=torch.float16)
sd_controlpose = StableDiffusionControlNetPipeline.from_pretrained('stabilityai/stable-diffusion-2-1-base',
                                                                   controlnet=controlnet_pose_model,
                                                                   torch_dtype=torch.float16)
sd_controlpose.enable_model_cpu_offload()
sd_controlpose.enable_attention_slicing()
sd_controlpose.enable_xformers_memory_efficient_attention()from diffusers import DEISMultistepScheduler
sd_controlpose.scheduler = DEISMultistepScheduler.from_config(sd_controlpose.scheduler.config)seed = 555
generator = torch.Generator(device="cuda").manual_seed(seed)
prompt = "professional photo of a young woman in the street, casual fashion, sharp focus, insanely detailed, photorealistic, sunset, side light"
neg_prompt = "ugly, tiling, closed eyes, poorly drawn hands, poorly drawn feet, poorly drawn face, out of frame, extra limbs, disfigured, deformed, body out of frame, bad anatomy, watermark, signature, cut off, low contrast, underexposed, overexposed, bad art, beginner, amateur, distorted face"
imgs = sd_controlpose(
prompt,
pose,
negative_prompt=neg_prompt,
num_images_per_prompt=4,
generator=generator,
num_inference_steps=20,
)
grid_img(imgs.images, 1, 4, 0.75)DeprecationWarning: ANTIALIAS is deprecated and will be removed in Pillow 10 (2023-07-01). Use LANCZOS or Resampling.LANCZOS instead.
img = img.resize((w,h), Image.ANTIALIAS)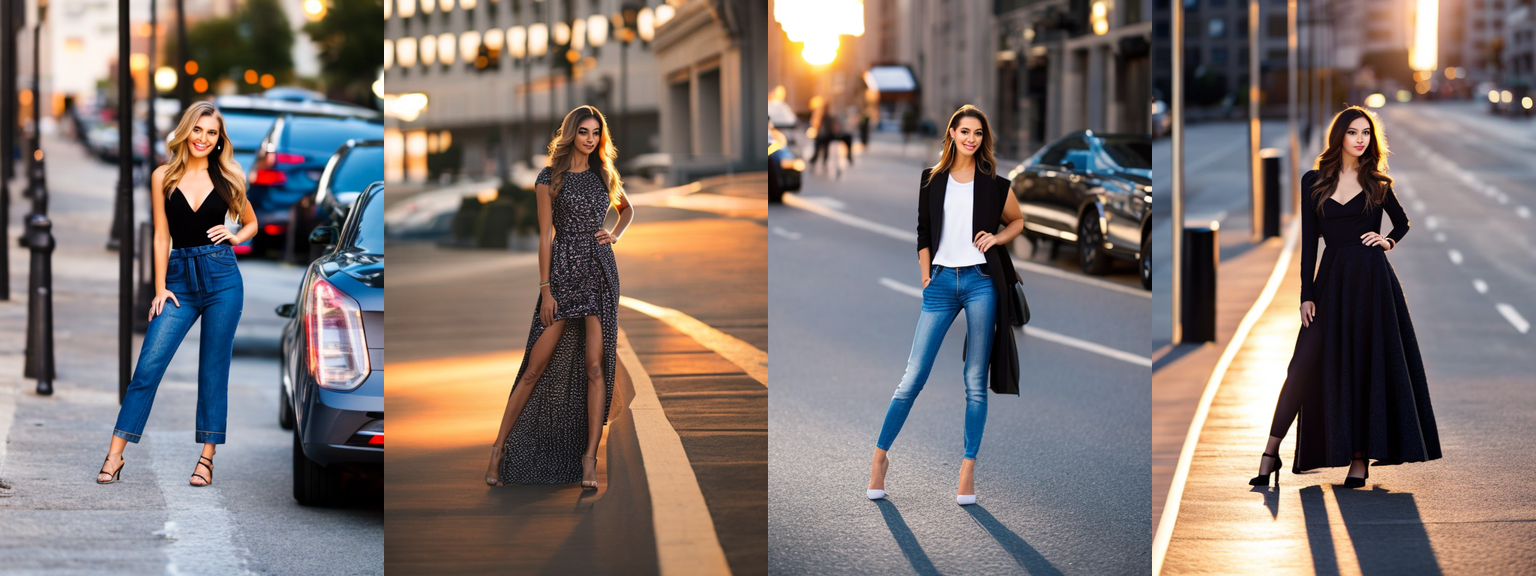
Trying Different Images and Prompts
Let’s switch things up and use a different pose image.
img_pose = Image.open("man-pose.jpg")

pose = pose_model(img_pose)

grid_img([img_pose, pose], 1, 2, scale=0.5)
DeprecationWarning: ANTIALIAS is deprecated and will be removed in Pillow 10 (2023-07-01). Use LANCZOS or Resampling.LANCZOS instead.
img = img.resize((w,h), Image.ANTIALIAS)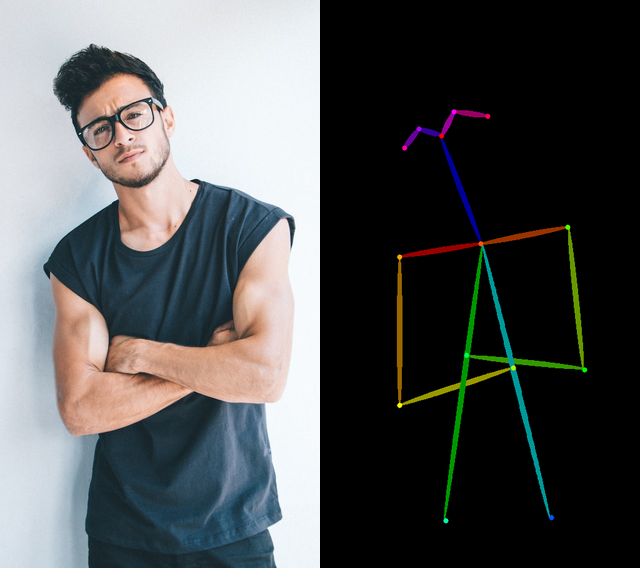
seed = 999
generator = torch.Generator(device="cuda").manual_seed(seed)
prompt = "professional photo of a young asian man in the office, formal fashion, smile, waring hat, sharp focus, insanely detailed, photorealistic, side light"
neg_prompt = "ugly, tiling, closed eyes, poorly drawn hands, poorly drawn feet, poorly drawn face, out of frame, extra limbs, disfigured, deformed, body out of frame, bad anatomy, watermark, signature, cut off, low contrast, underexposed, overexposed, bad art, beginner, amateur, distorted face"

imgs = sd_controlpose(
    prompt,
    pose,
    negative_prompt=neg_prompt,
    num_images_per_prompt=4,
    generator=generator,
    num_inference_steps=20,
)
grid_img(imgs.images, 1, 4, 0.75)
DeprecationWarning: ANTIALIAS is deprecated and will be removed in Pillow 10 (2023-07-01). Use LANCZOS or Resampling.LANCZOS instead.
img = img.resize((w,h), Image.ANTIALIAS)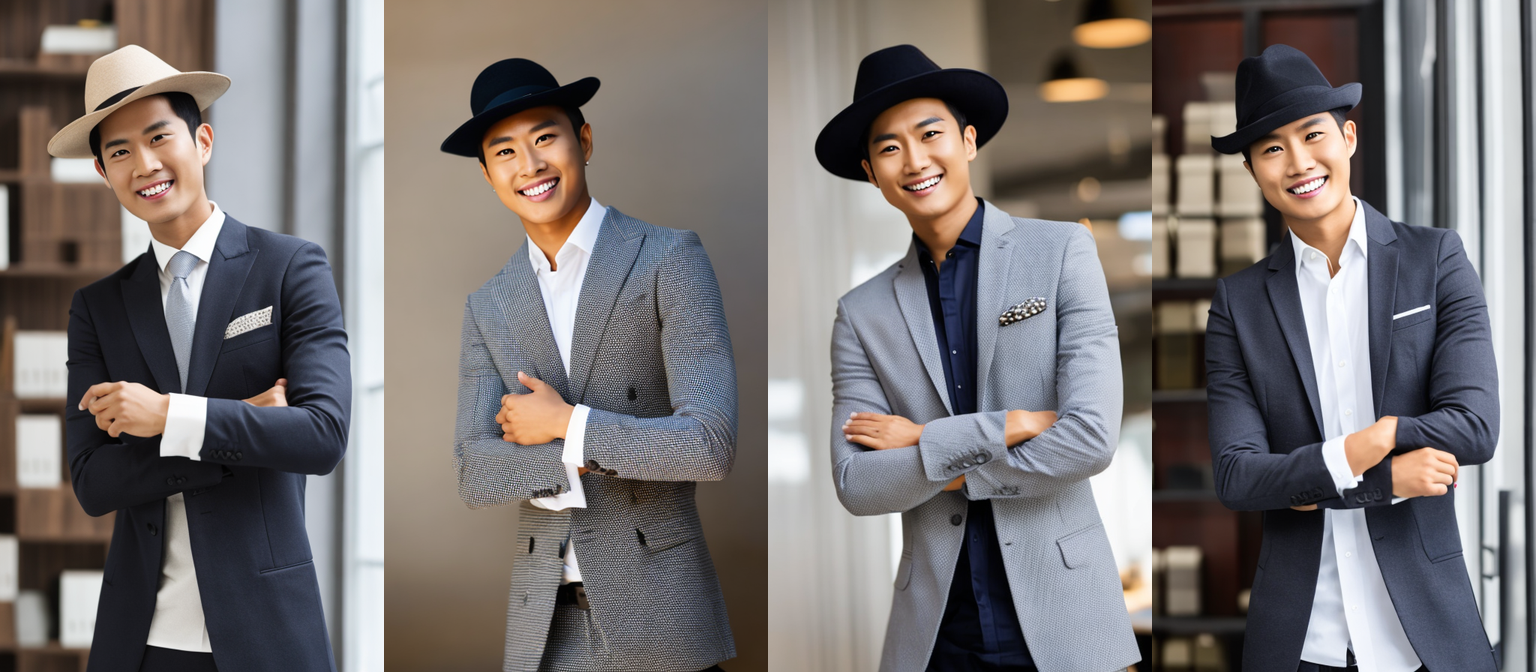
seed = 123
prompt = ["oil painting walter white wearing a suit and black hat and sunglasses, face portrait, in the desert, realistic, vivid",
          "oil painting walter white wearing a jedi brown coat, face portrait, wearing a hood, holding a cup of coffee, in another planet, realistic, vivid",
          "professional photo of walter white wearing a space suit, face portrait, in mars, realistic, vivid",
          "professional photo of walter white in the kitchen, face portrait, realistic, vivid"]

neg_prompt = ["helmet, ugly, tiling, closed eyes, poorly drawn hands, poorly drawn feet, poorly drawn face, out of frame, extra limbs, disfigured, deformed, body out of frame, bad anatomy, watermark, signature, cut off, low contrast, underexposed, overexposed, bad art, beginner, amateur, distorted face"] * len(prompt)
num_imgs = 1

generator = torch.Generator(device="cuda").manual_seed(seed)
imgs = sd_controlpose(
    prompt,
    pose,
    negative_prompt=neg_prompt,
    generator=generator,
    num_inference_steps=20,
)
grid_img(imgs.images, 1, len(prompt), 0.75)
DeprecationWarning: ANTIALIAS is deprecated and will be removed in Pillow 10 (2023-07-01). Use LANCZOS or Resampling.LANCZOS instead.
img = img.resize((w,h), Image.ANTIALIAS)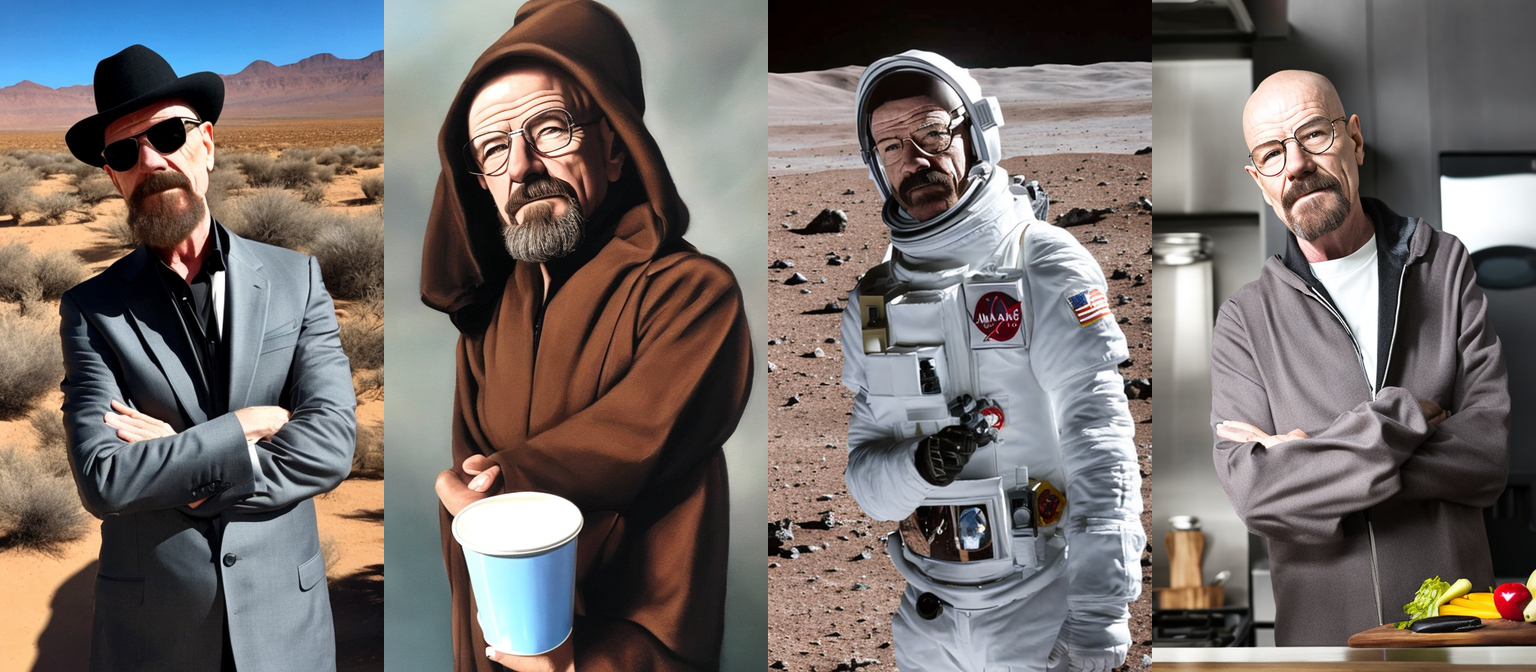
Improve The Result
For enhanced results:
- Experiment with various schedulers. Euler A is also suggested for use with ControlNet.
- Modify the parameters (CFG, steps, etc.).
- Employ effective negative prompts.
- Tailor the prompt to closely match the initial pose.
- Providing more context about the action is advisable. For instance, “walking in the street” typically yields better outcomes than simply “in the street”.
- Inpainting can be utilized to correct faces that haven’t been generated accurately.
Exercise ControlNet
# @title #### Student Identity
student_id = "your student id" # @param {type:"string"}
name = "your name" # @param {type:"string"}
# Intalling Libs
%pip install diffusers==0.14
%pip install -q accelerate transformers xformers
%pip install -q controlnet_aux
%pip install rggrader# @title #### 00. Generating Images Using Poses
from rggrader import submit_image
from diffusers import StableDiffusionControlNetPipeline, ControlNetModel
import torch
import cv2
from PIL import Image
from controlnet_aux import OpenposeDetector
from diffusers import DEISMultistepScheduler
# TODO:
# 1. Use the 'lllyasviel/ControlNet' model to extract the pose from the reference image. This model will allow us to understand the pose that is present in the image.
# 2. Use the ControlNet models 'thibaud/controlnet-sd21-openpose-diffusers' and 'stabilityai/stable-diffusion-2-1-base' to generate the desired image. These models will take the pose extracted from the previous step and use it to generate a new image.
# 3. The image generation will be based on the prompt that you input. Make sure your prompt is clear and describes the image you want to generate accurately.
# 4. Once the image is generated, save it in the 'results' folder. This will ensure that you can easily locate and review the image later.
# 5. Finally, select one of the generated images to upload. This image will be the final output of your exercise.
# NOTE: Remember, the quality of the generated image will greatly depend on the accuracy of the pose extracted from the reference image and the clarity of your prompt.
# Loading model and create output dir
pose_model = OpenposeDetector.from_pretrained('lllyasviel/ControlNet')
# Put your code here:
imgs = None
# ---- End of your code ----# Saving the results
!mkdir results
for i, img in enumerate(imgs.images):
img.save('results/result_{}.png'.format(i+1))# Submit Method
assignment_id = "00_controlnet"
question_id = "00_generating_images_using_poses"
submit_image(student_id, question_id, 'your_image.png') # change 'your_image.png' to the name of the image you want to upload (eg. results/result_3.png)